TRAVERSE Global v11.1
TRAVERSE Payment System (TPS) Overview
Payment Service Integration for TRAVERSE® (TPS) manages the interaction with external payment providers, including the encryption/decryption of any values shared between them and TRAVERSE. The payment service supports both card present and hosted payment forms.
Regular back office workflow is not dependent upon provider-based processing or validation. Additional workflow management utilizes an AR Payment Method type to identify external payments. Most processing, reporting, and inquiry systems within TRAVERSE are unaffected.
The TRAVERSE Payment System does not store any sensitive account information for external payments for PCI DSS compliance. All information is retained by the payment provider. Data for payment methods and transactions are stored in dedicated tables to isolate the service data from base processing.
Setup
The setup process for TPS follows the typical setup process for other functions in TRAVERSE, beginning with installing Build 18296 or higher that includes credit card integration.
- You must have an account with the payment service to obtain the credentials required for TRAVERSE. Contact your software solution provider for more information.
- If you need assistance with TPS setup, contact your software solution provider or TRAVERSE support.
- If you use EMV card readers, work with your payment service provider to install the required software to connect and run the card reader.
Use the SM Payment Service Integration function to set up the payment service settings.
To configure a payment service, select the service from the Name drop-down list. Once you select a service provider, the screen will display a number of data entry fields required for the integration to function properly.

- Select/enter 'OEHostPay' for the Name of the OpenEdge payment service.
- Enter your company's ID as provided by the payment processor into the XWeb ID field.
- Enter the authorization key your payment processor supplied into the Auth Key field.
- If applicable, enter the terminal ID for the current terminal into the Terminal ID field.
- Enter the URLs provided by your payment processor in the appropriate fields.
- Use the Update button on the toolbar to update the payment service settings with the values you entered/edited.

- In the Name field, select/enter 'Vantiv' for the Vantiv/Worldpay setup.
- Enter your company's account ID as provided by the payment processor into the Account ID field.
- Enter your company's account token in the Account Token field. Click the square button on the right side of the field to show the account token value.
- Enter 5328 into the Application ID field.
- Enter the IDs provided by your payment provider into the appropriate ID fields as applicable.
- If applicable, enter the lane ID for the current terminal into the Lane ID field. Lanes are used to link EMV devices to the port or computer the EMV is connected to. Use the Lane Manager function to add lanes (EMV devices) to the system.
- Enter the URLs provided by your payment processor in the appropriate fields. The Hosted URL should be set as needed for your gateway. Edit these values only if necessary.
- Select a Market Code from the drop-down list that most accurately describes the service.
- Select the check box to Allow Partial Approvals to approve a portion of the payment prior to processing the TRAVERSE transaction.
- Select the check box to Check For Duplicate Transactions when entering payments into transactions. The process will check for duplicate Customer ID, Amount, and Credit Card Number.
- Enter the remaining URLs provided by your payment processor in the appropriate fields. Edit these values only if necessary.
- Enter the developer key and the developer secret your payment processor supplied into the Developer Key and the Developer Secret fields.
- If using an EMV device (card reader) connected directly to the network, which is the normal configuration when TRAVERSE runs in the cloud or when users access TRAVERSE via Remote Desktop, mark the Use Cloud check box; otherwise, if the EMV is connected directly to client computers, leave the check box blank.
- The Test Mode field setting allows for testing the configuration. Mark the Test Mode check box to test payment processing. Clear the check box to enable payment processing for customers.
- Select the check box to Allow Debit cards to be used along with credit cards. Otherwise, clear the check box to allow credit cards only.
- Select the check box to Allow Manual Entry of the credit card number on the EMV if a card can’t be swiped. Otherwise, clear the check box to use the EMV device exclusively to capture the credit card information.
- Select how you want to use signature capture functionality for your payment services from the Prompt for Signature drop-down list.
- If you choose to require a signature above a dollar amount, enter that dollar amount into the Threshold Amount field. If you are not using the threshold, or do not have a threshold amount, enter 0 into the field.
- Use the Update button on the toolbar to update the payment service settings with the values you entered/edited.
OpenEdge: If you are going to use a card reader device (EMV), you will need to install RCM Windows_GA.exe. The RCM program has a Device Configure option that will allow you to change the communication port that the device uses if necessary, such as COM4 or COM6.
Vantiv Cloud: There is no additional software to install. Connect the EMV directly to the network; the EMV is available to multiple users on the network. If you connect the EMV device to a port, use the Lane Manager function to pair the device with the port to which it is connected. When a device is plugged into a port and it has not been paired to Express API credentials, it will boot up and display an Activation Code to use in the Lane Manager function. Work with your payment service provider to install the required software to connect and run the card reader.
Vantiv Direct: You must run the triPOS Setup.exe installation. This creates a Windows Service (triPOS.NET) that is required for the EMV to work. The default installation path is: C:\Program Files (x86)\Vantiv. There is also a triPOS.config file created in the C:\Program Files (x86)\Vantiv\triPOS Service folder that may need to be configured. Connect the EMV to the computer with triPOS installed; the EMV is only available to that computer.
In the AR Payment Methods screen from the AR Setup and Maintenance menu, create a new payment method ID for the credit card processor you are using, and select a Payment Type of 'External'. You set up the external payment method(s) as you would a credit card method such as VISA, so make sure you also select a GL Account and an optional CC Company ID. If you leave CC Company ID blank, open invoices for payments are not created, which eliminates the need to create additional cash receipts to offset the entries.
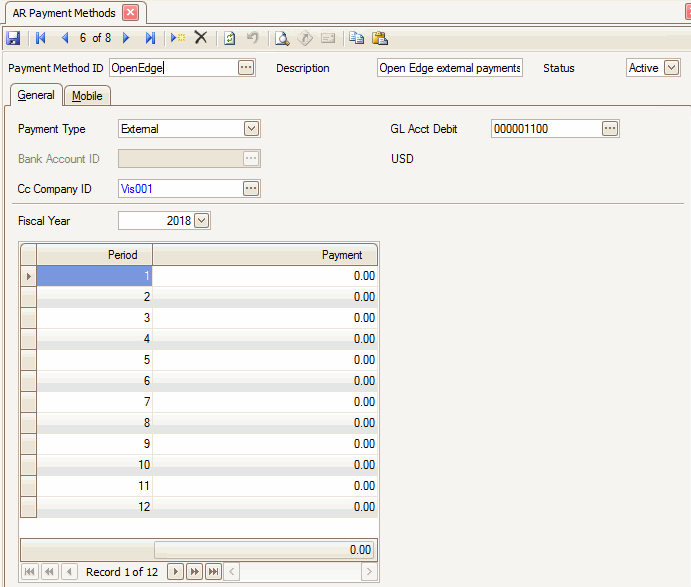
In the System Manager Business Rules:
Under Defaults – Services, select the Payment Provider you want to use.

The Payment Provider business rule must be set separately for Point-of-Sale and Portal applications.
Under TPS Settings:
NOTE: You must select an AR Payment Method for OpenEdge and/or Vantiv. If you do not select a value for at least one of these AR payment methods, external-type credit card payments will not function correctly.
- Select an AR Payment Method ID for OpenEdge, as applicable.
- Select an AR Payment Method ID for Vantiv/Worldpay, as applicable.
- If you want to save a PDF copy of the receipts to the database (archive the receipts), select ‘Yes’ to Use Archive, and enter text for the Archive Watermark.

If you have workstations that use settings that are different than those you entered in the Payment Service Integration screens, you can use the Workstation defaults option in the User Defaults – Admin function found on the SM Company Setup menu. Use this option to configure a workstation to use a credit card reader, show a print preview (for testing purposes) rather than printing a receipt, or set a workstation up for a different method of utilizing the payment service, such as retail workstations rather than MOTO (mail order/telephone order). You can configure certain workstations to use a Retail account by entering the applicable settings in the workstation defaults screen.
The options that can be set per workstation may differ depending on the payment service you are using. Options may include allowing manual entry, device type, print mode, prompting for signature, terminal ID, and lane ID, among others.
To set up workstation defaults, open the User Defaults – Admin function from the SM Company Setup menu.
- Select ‘Workstation’ as the Type of default from the drop-down list.
- In the Workstation field, if you are entering a new workstation, enter the workstation name into the field. If you are editing the workstation, select it from the drop-down list.
- If you are entering a new workstation, you have the option to copy defaults from another workstation by selecting an existing workstation in the Copy From drop-down list.
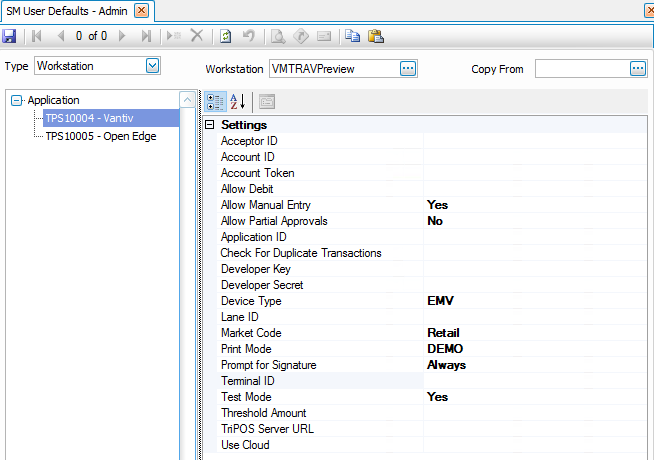
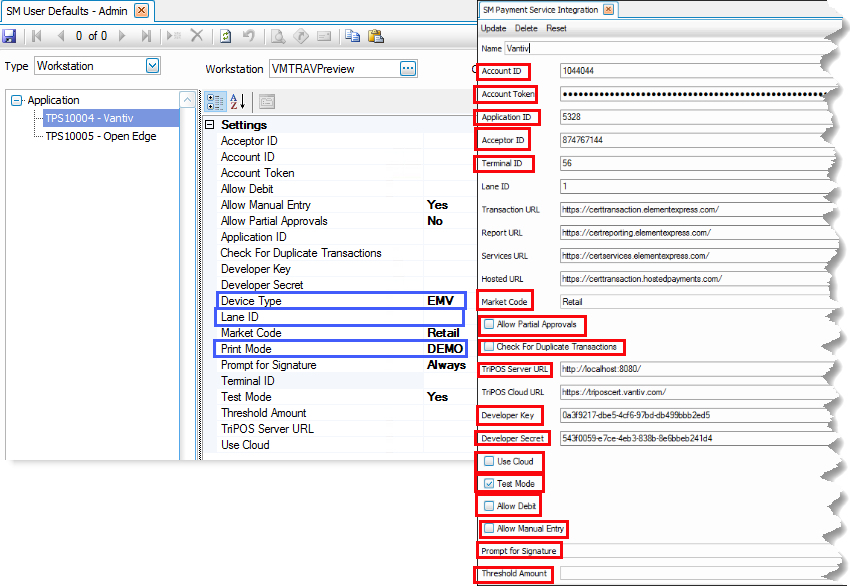
- The settings for the selected payment service are also available on the Payment Service Integration configuration screen for the payment service. Settings you select in the User Defaults – Admin function will override the global settings on the Payment Service Integration screen.
You do not have to enter values for settings you do not want to override.
The settings outlined in blue are only found on the User Defaults – Admin screen. The settings outlined in red appear in both screens.
Vantiv/Worldpay
OpenEdge
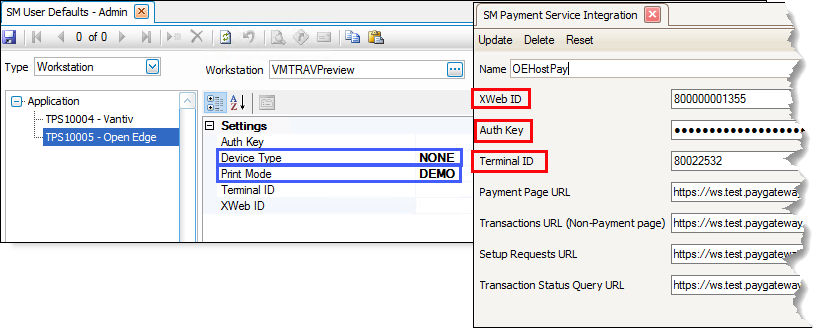
- If you want the workstation to use a credit card reader, such as in a retail situation, set the DeviceType value to ‘EMV’. If you set the DeviceType value to 'NONE', the user must enter credit card information manually.
- For Vantiv/Worldpay, if you set the DeviceType to ‘EMV’, and the device has been paired to a port using the Lane Manager function, enter the Lane ID for the device.
- By default, the workstation will print the receipt right after the card is processed. A PrintMode value of ‘PRINT’ or blank will perform the default action (print a receipt after the card is processed). If you want the workstation to display a print preview of the receipt, such as during testing, set the PrintMode value to 'DEMO'.
NOTE: The print preview of the receipt will not allow you to save or print the receipt. If you have archiving turned on in the SM business rules, a PDF of the receipt is saved as an archived document, which will allow you to retrieve the receipt if needed.
- If the workstation utilizes the payment service differently than others, such as a retail workstation rather than MOTO (mail order/telephone order), you can configure the workstation to use a Retail account by entering the applicable settings.
- When you are finished editing settings, click the Save button on the toolbar.
NOTE: To view the saved workstation defaults, you must close the User Defaults – Admin screen, then reopen it.
Workflow
When consumers make an electronic purchase using a credit or debit card (or a digital or mobile wallet backed by stored credentials), a variety of players from banks to credit card companies to payment processors cooperate to facilitate the transaction. The process can vary depending on the nature of the gateway and payment.
- The consumer makes a purchase: The consumer starts by presenting their payment credentials to a merchant. This can be done in a variety of ways including keying a card number on a website, using a mobile app, or swiping/dipping a card at a point of sale.
- The merchant relays the payment request to a gateway: Merchants may have their own custom application (a website or mobile app for example) or they may rely on a third-party shopping cart or integrated point of sale provider already integrated to a gateway.
- The gateway provider receives the request: When the gateway provider receives a transaction, they typically relay authorizations or other instructions to a payment processor. Some large gateways have relationships with a specific processor, while others have connections to multiple processors.
- The payment processor facilitates the transaction: On receipt of a request from the gateway, the payment processor relays the request to the appropriate card brand that will in turn route the request to the appropriate issuing bank for authorization. Assuming there are sufficient funds and the account is in good standing, the bank and card brand will relay an approval back to the processor that will in turn be relayed to the gateway and ultimately the merchant. The payment processor facilitates the movement of money from the cardholder’s issuing bank (who is essentially loaning the consumer money until they pay their credit card bill) to the appropriate merchant bank account.
After you have set up the payment service integration, you always use the Payments button on the toolbar to set up a new credit card for a customer, to enter a payment that uses an external payment method, or to set up a credit card payment for a recurring entry if you are utilizing an external payment method. Regular cash, check, and other offline options still function as usual via the regular transaction screens.
When you are not using an EMV (credit card reader), you will enter the credit card info on the credit card information entry form that displays. When you are using an EMV, you will be directed to the EMV device to swipe, tap, or insert (if chip) the card. You can also use an EMV device, if available, to enter a new card for a customer.
AR Transactions and SO Orders
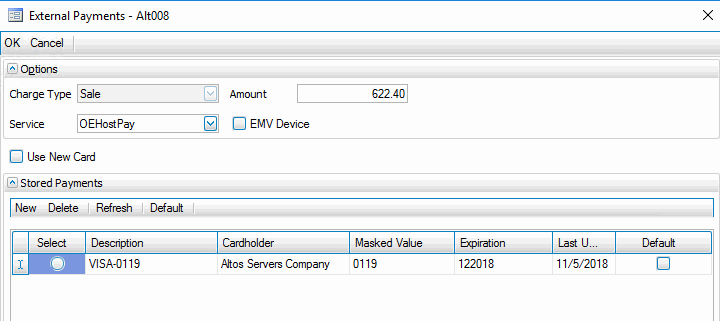
When you use the Payments button on the toolbar, the External Payments screen opens.
AR External Payments screen
SO External Payments screen
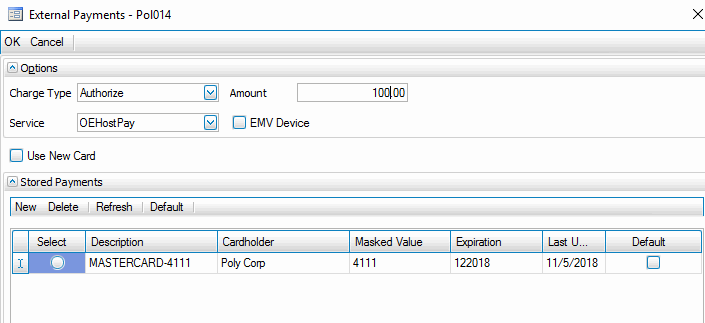
- In the Options section (header) of the screen, the charge type of 'Sale' will appear in the read-only Charge Type field in AR external payments. In SO external payments you can select the Charge Type from the drop-down list:
- Authorize will store the payment until processed. The 'Authorize' charge type is used more commonly at the beginning of a sales order transaction to verify the card has funds available for the transaction. Posting a sales order with an Authorization will update the invoice number and amount due when advancing the Authorization to a Captured payment. The payment will be applied to the invoice once processing is complete, presuming the invoice still exists within the open invoice system. Note: The amount updated during posting cannot exceed the original authorization amount.
- Sale will apply the payment to the invoice when processed. The 'Sale' charge type is used more commonly toward the end of a processing a sales order when you have finalized the exact amount of the payment.
- Accept or enter the Amount to be charged.
- Select the external payment service to use for the payment from the Service drop-down list.
- If you are using an external card reader with the service, mark the EMV Device check box. Make sure the service configuration is set to use a device.
- Mark the Use New Card check box to allow the credit card information to be entered rather than select a stored payment. When you mark the check box, the Stored Payments detail grid will collapse. Click OK on the top toolbar to open a credit card information entry form.
- If there are no external payments stored, click on the New button on the toolbar to open a credit card information entry form. Once you submit the credit card information on the entry form, the payment will appear in the Stored Payments detail section of the External Payments screen.
- If there are external payments stored, mark the Select radio button to choose the payment to use.
- If the payment is designated to be used by default, the Default check box will be marked. To designate a payment as the default payment, select the payment, then use the Default button on the toolbar. If you want to remove the default designation from a payment, select the record, then use the Default button on the toolbar to toggle the check box.
- Click OK to process the payment and return to the previous screen, or Cancel to cancel the payment.
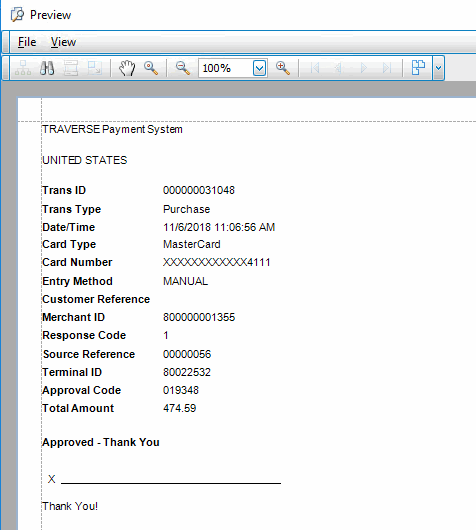
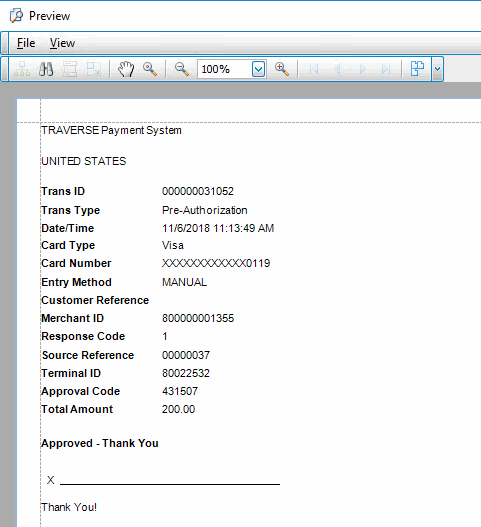
- Once the payment has been processed, a receipt for the payment will print.
NOTE: If you have changed the default behavior from automatically printing the receipt to showing a print preview, the print preview of the receipt will not allow you to save or print the receipt. If you have archiving turned on in the SM business rules, a PDF of the receipt is saved as an archived document, which will allow you to retrieve the receipt if needed.
AR External Payment Receipt
SO External Payment Receipt
NOTE: If the payment does not go through, an error message will appear.
Credit Card Information entry form
If you need to enter a credit card number, the Credit Card Information Entry screen will appear. Note that the credit card information entry screen may be different depending on the payment service provider you use.
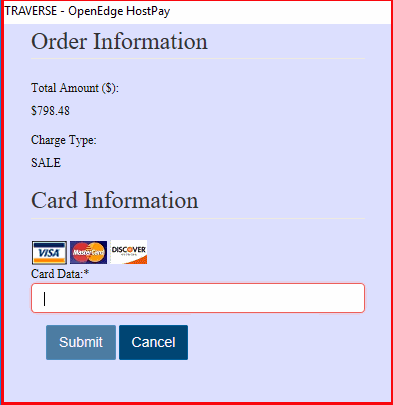 MMMMM
MMMMM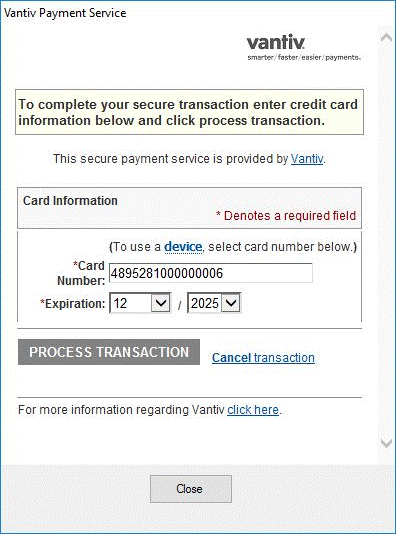
Enter the credit card number into the appropriate field. Be aware the form may expand to allow you to enter additional card information.
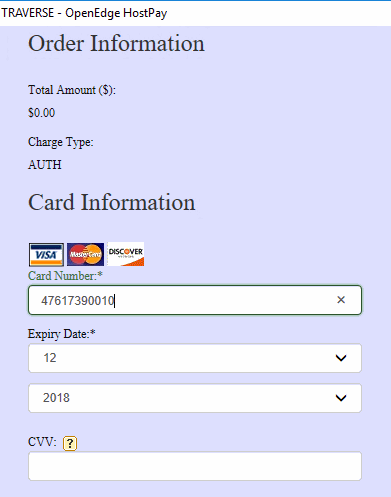
Enter the card's expiration date (month and year) in the appropriate fields.
Enter the card's security code from the back of the card in the CCV field.
Scroll down in the entry form to enter/edit card holder information.
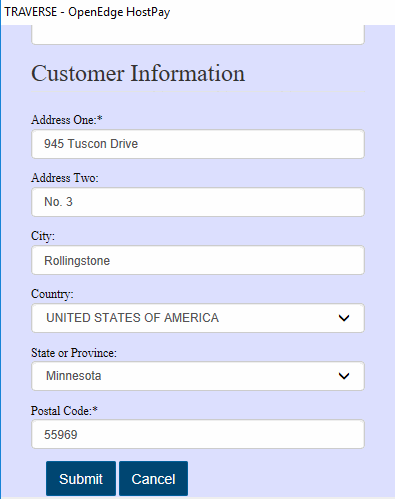
Enter or edit the address information in the appropriate fields.
Click the Submit button (OpenEdge) or the Process Transaction button (Vantiv) to submit the information, or use the Cancel button to cancel the process.
NOTE: If the payment does not go through, an error message will appear.
AR External Payments
If you have posted the AR or SO invoice without a payment, use the External Payments function to collect funds (Sale) or return funds (Refund) through the TRAVERSE Payment System (TPS), as well as generate cash receipts for payments processed through TPS.
To use the External Payments function, select External Payments from the AR Transactions menu.
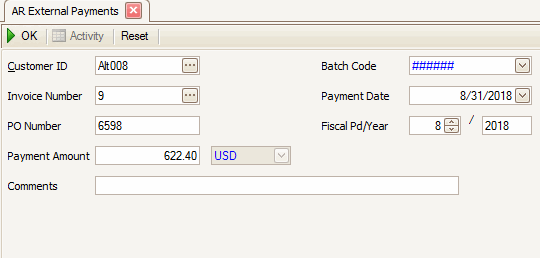
- Select a customer for which to process payment from the Customer ID drop-down list.
- Select an unpaid Invoice Number to process, or leave this field blank. Because you can apply payments 'On Account', no specific invoice number is required.
- Accept or edit the customer PO Number as necessary. This field is optional.
- Enter a Payment Amount. You can enter a negative amount if you are processing a refund. If you have selected an invoice, the invoice amount will appear. If you did not enter an invoice number, you must enter an amount <> zero.
- The payment Currency is displayed and cannot be changed. External payments are only allowed using USD.
- Enter any Comments about the payment, as applicable.
- Select a Batch Code for the payment process.
- Accept or edit the Payment Date and the Fiscal Pd/Year. This date and fiscal period will be used for the cash receipt when it is generated.
- When you click OK, the External Payment entry form for the customer will display. The stored external payment information will appear in the Stored Payments detail section of the screen. If there is no external payment method on file, click the New button to open a credit card information entry form.
When you are using an EMV and you check the EMV Device box, you will be directed to the EMV device to swipe, tap, or insert (if chip) the card. If you want to manually enter a new credit card, select the New button with the Use New Card box marked to open a credit card information entry form.

- In the Options section (header) of the screen, the charge type will appear in the read-only Charge Type field.
- Accept or edit the Amount to be charged.
- Select the external payment service to use for the payment from the Service drop-down list.
- If you are using an external card reader, mark the EMV Device check box. Make sure the service configuration file is set to use a device.
- Mark the Use New Card check box to force the credit card information to be entered rather than select a stored payment. Click the OK button on the toolbar to open a credit card information entry form.
- If there are no external payments stored, click on the New button on the toolbar to open a credit card information entry form. Once you submit the credit card information on the entry form, the payment will appear in the Stored Payments detail section of the External Payments screen.
- If there are external payments stored, mark the Select radio button to select the payment to use.
- If the stored payment is designated to be used by default, the Default check box will be marked. To designate a stored payment as the default payment, select the payment, then use the Default button on the toolbar. If you want to remove the default designation from a stored payment, select the record, then use the Default button on the toolbar to toggle the check box.
- Click OK to validate and process the payment and return to the previous screen, or Cancel to cancel the payment.
- Once the payment has been processed, a receipt for the payment will print.
NOTE: If you have changed the default behavior from automatically printing the receipt to showing a print preview, the print preview of the receipt will not allow you to save or print the receipt. If you have archiving turned on in the SM business rules, a PDF of the receipt is saved as an archived document, which will allow you to retrieve the receipt if needed.

After AR and SO invoices have been posted, the Process External Payments function on the AR Transaction Journals menu allows you to interact with the TRAVERSE Payment System (TPS) to finalize payments, generate cash receipts once the payments are finalized, refresh payment methods, finalize payment service transactions, etc.
Validation errors encountered during cash receipt generation will stop the payment activity on that record, but the remaining records will be processed.
Use the Column Chooser to add other available columns to the screen.
Open the Process External Payments screen from the AR Transaction Journals menu.

- The check box to Update Payment Methods is marked by default. This setting affects how updates passed to TPS from the payment provider are applied to the TRAVERSE backoffice tables. See Update Payment Methods for more information.
- Select a Batch Code for the cash receipts that are created.
- Enter any Comments about the payment processing, as applicable.
- Mark the Select check box for the payment records you want to process. Use the Select All button on the toolbar to mark all the check boxes, or use the Unselect All button to clear all the check boxes.
- Select an action using the following buttons:
Select To OK Submit the list of items to be processed. Activity Display the Activity Log for the function. Reset Set all fields to their default values. Select All Marks the Select check box for all items. Unselect All Clears the Select check box for all items. - The process log displays when the operation is complete.

Examples
If you are at the point where you are verifying a sales order or entering a new sales order that has been shipped or will be shipped immediately, and are entering a new external payment, select the payment type of 'Sale'. The payment will be applied to the invoice once posted.
When an external payment is entered for an AR transaction, the Charge Type is always 'Sale' and cannot be changed.
- Use the SO Orders function to enter a New transaction. (or use the AR Transactions function to enter an invoice. Skip step 7 below.)
- Click the Payments button in the toolbar to display the External Payments screen.
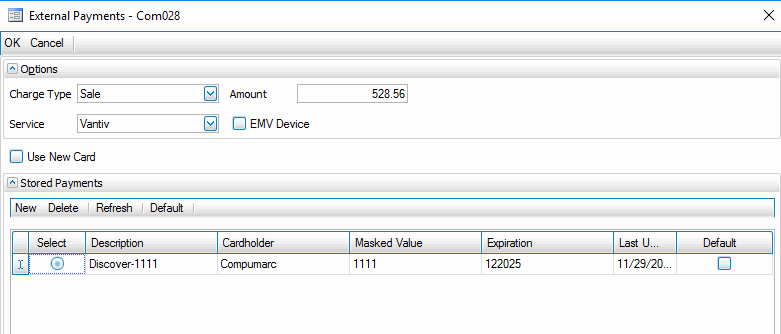
- Select 'Sale' as the Charge Type. If you are entering an AR Transaction, the read-only Charge Type will be 'Sale'.
For a Sales Order transaction, you would select 'Sale' if you are going to be processing the verification of the transaction soon after entering the payment. If you will not be verifying the sales order for a longer period of time, select 'Authorize'. See the section below about processing an Authorize charge type.
- Accept the defaults for the Amount and Service, and Select a Stored Payment.
- Click OK to process the payment to the payment service.
- Once the payment has been processed a receipt will print, and you will return to the SO Transaction or AR Transaction screen.
Information about the payment will appear on the Payments tab.
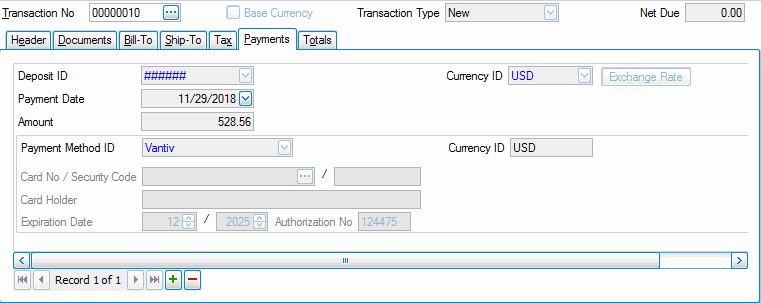
Note that the information returned from the payment providers can vary, and may not provide much detail for display within the TRAVERSE payment screen.
- Once the order has shipped, Verify the sales order.
- Print the invoice.
- Print the Sales Journal and Post Transactions to post the invoice.
- Use the Process External Payments function on the AR Transaction Journals menu to generate the cash receipt for the invoice.

- The Source Status will be 'Confirmed', the Type will be 'Sale', and the Status will be 'Approved'.
- Mark the Select check box for the invoice record you posted and for which you want to generate the cash receipt.
- Click OK to process the selected payment records. The Process External Payments log will preview.
- Print the Cash Receipts Journal and Post Cash Receipts to post the cash receipt(s) and apply the payment to the invoice.
- In the AR Hold/Release Invoices function, you will see the payment applied to the invoice. In this example, the invoice number is 26008.

If you are entering a new Sales Order that will not be shipped right away, select a payment type of 'Authorize'. When you select the payment type of 'Authorize' when entering a TPS payment transaction, the payment will be applied to the invoice once posted. Note: The amount updated during posting cannot exceed the original authorization amount.
- Use the SO Orders function to enter a New transaction.
- Click the Payments button in the toolbar to display the External Payments screen.
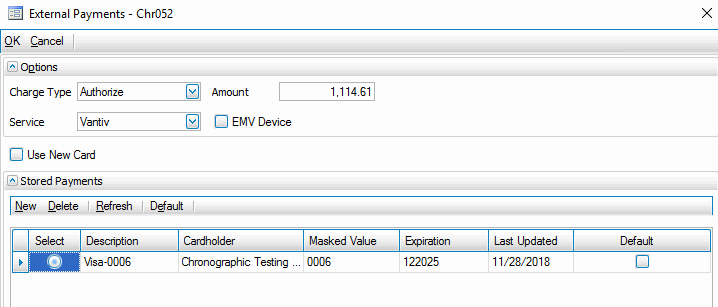
- Select 'Authorize' as the Charge Type. The Authorize charge type is used mainly to do a verification with the credit card to make sure the funds are available to process the transaction, once the sale is processed.
- Accept the defaults for the Amount and Service, and select a Stored Payment.
- Click OK to process the payment to the payment service.
- Once the payment has been processed, the receipt will print and you will return to the SO transaction screen.
- Once the order ships, Verify the sales order and print the invoice.
- Print the Sales Journal and Post Transactions to post the invoice.
- Use the Process External Payments function on the AR Transaction Journals menu to generate the cash receipt for the invoice.

- The Source Status is now 'Confirmed', the Type will be 'Capture', and the Status will be 'Pending'.
- Mark the Select check box for the invoice record you posted and for which you want to generate the cash receipt.
- Click OK to process the selected payment records. The Process External Payments log will preview.

- Print the Cash Receipts Journal and Post Cash Receipts to post the cash receipt(s) and apply the payment to the invoice. The Post Cash Receipts log will preview.
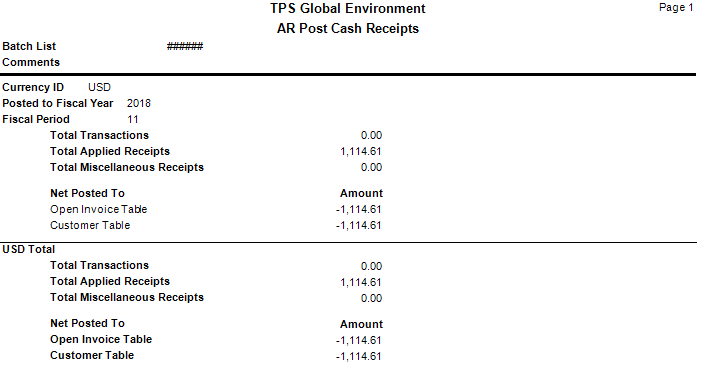
- In the AR Hold/Release Invoices function, you will see the invoice and the payment.

You can enter a sales order invoice and an AR Transaction without entering a payment into the transaction, and pay the invoice after it has been posted using the TPS system.
Follow these steps to apply an external payment to a posted invoice:
- Use the SO Orders function to enter a New transaction. (or use the AR Transactions function to enter an invoice. Skip step 2 below.)
- Once the order has shipped, Verify the sales order.
- Print the invoice.
- Print the Sales Journal and Post Transactions to post the invoice.
- Use the External Payments function on the AR Transactions menu to pay an invoice using a credit card and the TPS system.

- Select a customer for which to process payment from the Customer ID drop-down list.
- Select an unpaid Invoice Number to process, or leave this field blank. Because you can apply payments 'On Account', no specific invoice number is required.
- Enter a Payment Amount. You can enter a negative amount if you are processing a refund. If you have selected an invoice, the invoice amount will appear. You must enter an amount <> zero.
- Select a Batch Code for the payment process.
- When you click OK, the External Payment entry form for the customer will display. The stored external payment information will appear in the Stored Payments detail section of the screen. If there is no external payment method on file, click the New button to open a credit card information entry form.
When you are using an EMV and you check the EMV Device box, you will be directed to the EMV device to swipe, tap, or insert (if chip) the card. If you want to manually enter a new credit card, select the New button with the Use New Card box marked to open a credit card information entry form.
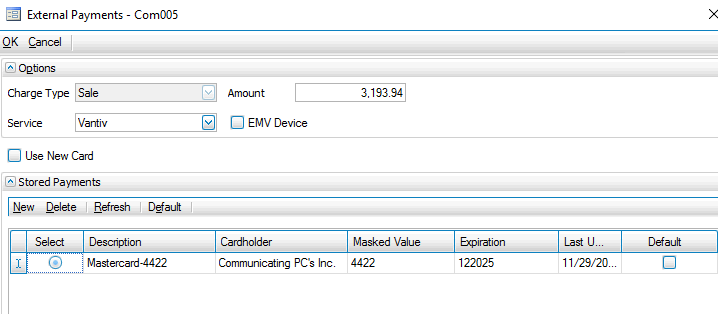
- The Charge Type is 'Sale'; this field is read only.
- Accept the defaults for the Amount and Service, and select a Stored Payment.
- Click OK to process the payment to the payment service.
- Once the payment has been processed, a receipt will print and you will return to the External Payments screen.
- Exit the External Payments screen.
- Print the Cash Receipts Journal and Post Cash Receipts to post the cash receipt(s) and apply the payment to the invoice.
- In the AR Hold /Release Invoices function, you will see the payment applied to the invoice. In this example, the invoice number is 25006.

You can select an external payment method when entering Project Costing deposits.
Follow these steps to apply a credit card payment to a project:
- Use the PC Deposits function to select a project to which you want to apply a deposit.
- Select a Payment Method ID that is an external payment method.
When you click the OK button, an External Payments screen will open to allow you to select a stored payment.
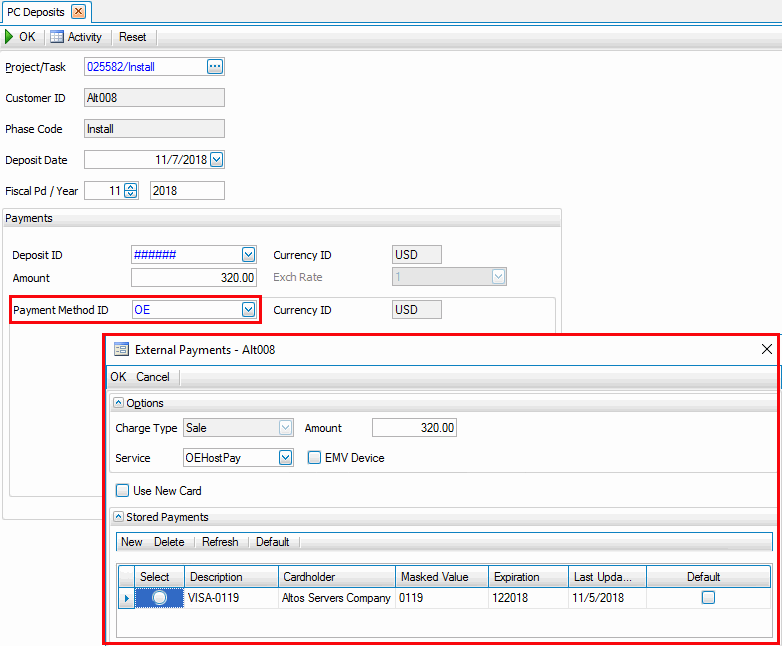
- Select a stored payment, then click the OK button to return to the PC Deposits screen. Click the OK button to process the payment. You can view the payment using the Project View or the Billing History View functions.
- Use the Process External Payments function on the AR Transaction Journals menu to generate the cash receipt for the deposit.

- The Source Status will be 'Confirmed', the Type will be 'Sale', and the Status will be 'Approved'.
- Mark the Select check box for the invoice record you posted and for which you want to generate the cash receipt.
- Click OK to process the selected payment records. The Process External Payments log will preview.
- Print the Cash Receipts Journal and Post Cash Receipts to post the cash receipt(s) and apply the payment to the project.
- In the AR Hold/Release Invoices function, you will see the payment applied to the project. In this example, the project number is 025582.

You can select an external payment method when printing an online invoice for a work order entry.
Follow these steps to apply a credit card payment to a work order entry:
- Use the Work Order Entry function to select a work order entry to which you want to apply an external payment.
- Select to print an online invoice from the Print button on the toolbar. The Print Invoice screen will open.
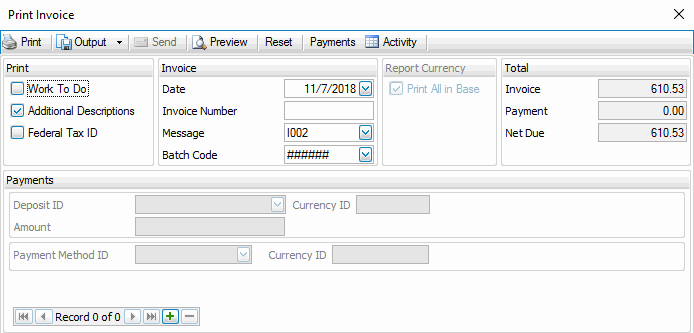
- Click the Payments button on the toolbar. An External Payments screen will open to allow you to select a stored payment.
For information on entering a new payment to store, see the External Payments topic.
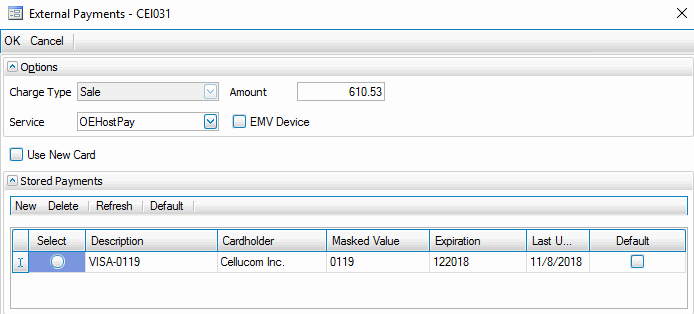
- Select a stored payment, then click the OK button to return to the Print Invoice screen. A customer receipt will be generated. You can print the invoice as usual from the Print Invoice screen. The invoice will reflect the amount paid.
- Use the Process External Payments function on the AR Transaction Journals menu to generate the cash receipt for the payment.

- The Source Status will be 'Confirmed', the Type will be 'Sale', and the Status will be 'Approved'.
- Mark the Select check box for the invoice record you posted and for which you want to generate the cash receipt.
- Click OK to process the selected payment records. The Process External Payments log will preview.
- Print the Cash Receipts Journal and Post Cash Receipts to post the cash receipt(s) and apply the payment to the project.
- In the AR Hold/Release Invoices function, you will see the payment applied to the work order invoice. In this example, the invoice number is 12.


